Bits and Bites – Homemade Pretzel Bites (and Pretzels)

One of my first endeavors at baking with yeast was homemade pretzel bites, using this recipe from Two Peas and Their Pod. The recipe had pretty simple ingredients, so I thought it wouldn’t be too bad. However, I overlooked the part where you need to boil the dough in a baking soda solution. Now, if you made regular sized pretzels with this dough, boiling wouldn’t be too bad. But if you decide to make pretzel bites, well, that’s another story. This dough makes A LOT of pretzel bites. I never counted how many, but it definitely was close to 100.

The most difficult part of the recipe, in my opinion, was boiling the dough, then transferring them to the baking sheet, sprinkling them with salt, and putting them into the oven as fast as you could. That’s a lot of steps to do in a short amount of time. After making probably 100 bites, I surrendered and made regular pretzels so I’d use up the dough faster. Shaping the dough into pretzel shapes was actually a lot of fun. If you want to bake with your kids, I definitely recommend making pretzels. They’ll really enjoy it. 🙂

These pretzel bites were such a hit! My friends were amazed that I made them myself and several of them asked me for the recipe. If you’re in the mood for baking something a bit more savory, I definitely recommend making pretzels. They’re pretty simple and delicious!

Just a few notes: 1) I noticed though was that if you boil the dough in the baking soda solution too long, the pretzels taste a bit like baking soda. 2) When sprinkling the bites/pretzels with salt, add a lot more than you think you should. The salt falls off easily, so the pretzels aren’t that salty. 3) If you decide to sprinkle them with cinnamon and sugar (like I tried), do this after they’re baked. If you sprinkle them before, the sugar might burn!

Soft Pretzels
Adapted from Two Peas and Their Pod

1 1/2 cups warm water
2 tablespoons light brown sugar
1 package active dry yeast (2 1/4 teaspoons)
3 ounces unsalted butter, melted
2 1/2 teaspoons kosher salt
4 1/2 to 5 cups all-purpose flour
Vegetable oil
3 quarts water
3/4 cup baking soda
1 whole egg, beaten with 1 tablespoon cold water
Coarse sea salt

1. Combine the water, sugar, yeast, and butter in the bowl of a stand mixer and mix with the dough hook until combined (or if you don’t have a dough hook like me, do it the old-fashioned way – by hand!) Let sit for 5 minutes. (I proofed the yeast separately, just with warm water and sugar.) 

2. Add the salt and flour and mix on low speed until combined. Increase the speed to medium and continue kneading until the dough is smooth and begins to pull away from the side of the bowl, about 3 to 4 minutes. If the dough appears too wet, add additional flour, 1 tablespoon at a time. Remove the dough from the bowl, place on a flat surface and knead into a ball with your hands.

3. Oil a bowl with vegetable oil, add the dough and turn to coat with the oil. Cover with a clean towel or plastic wrap and place in a warm spot until the dough doubles in size, about 1 hour.

4. Preheat the oven to 425 degrees F.

5. Bring the water to a boil in a small roasting pan (I used a pot) over high heat and add the baking soda.

6. Remove the dough from the bowl and place on a flat surface. Divide the dough into 8 equal pieces, about 4 1/4 to 4 1/2 ounces each. Roll each piece into a long rope measuring 22 inches and shape. Cut the dough into one inch pieces to make the pretzel bites. (Or shape the dough into pretzels!)

7. Boil the pretzel bites in the water solution in batches. Boil for about 30 seconds. (Make sure you don’t leave them in for too long!) Remove with a large slotted spoon.

8. Place pretzel bites on a baking sheet that has been sprayed with cooking spray. Brush the tops with the egg wash and season liberally with the salt. Place into the oven and bake for 15 to 18 minutes until golden brown.

9. Remove to a baking rack and let rest 5 minutes before eating.

This post has been Yeastpotted.

Banana Doughnuts with Peanut Butter Glaze

A few months ago, I went to Michael’s and was handed a 50% coupon. I didn’t want to spend a ton of money, so I decided to buy a doughnut pan. It was one of the best purchases I’ve made! Since then, I’ve been baking doughnuts non-stop.

I’ve never really been a big doughnut fan, but for some reason, after I bought my doughnut pan, I was hooked on making them! I even have a board on Pinterest dedicated to just doughnut recipes. One of my favorite recipes is this banana doughnut with peanut butter glaze from Shutterbean.


They’re basically a cross between a doughnut and banana bread. The doughnuts were incredibly moist, but it’s the peanut butter glaze that you’ll rave about. Feeling a bit lazy, I didn’t brown the butter. I’m sure if you did that, the frosting would taste even better! Since my doughnut pan only bakes six doughnuts at a time and I was a bit too impatient to wait to use the pan again, I used the rest of the batter to make muffins. So if you don’t have a doughnut pan, you can just turn this recipe into muffins! Also, you might notice from the photo that three are in the shape of Mickey Mouse. When my family went to Disneyland for Christmas, I just had to buy a silicone Mickey Mouse shaped muffin pan. They’re so cute!

The combination of the banana doughnuts and the peanut butter glaze is amazing! It’s just like eating a peanut butter banana sandwich, but a little less messy since bananas aren’t flying out whenever you take a bite. Also, these doughnuts are super easy to make and they come out so beautifully! If you’ve got a doughnut pan at home and want to do a little something different for breakfast, I definitely recommend trying out this recipe. The only thing you’ll probably regret is that you didn’t bake these doughnuts earlier, just like me!

Soft and Fluffy – Pandan Bread and Pineapple Buns

Being Chinese-American, I’ve been to a lot of Chinatowns, dim sum restaurants, and of course, Chinese bakeries. Whenever we visited my relatives in Oakland, we’d always go to Chinatown. And if we didn’t happen to eat dim sum that morning, we’d always go to my mom’s favorite bakery to buy a big pink box filled with everyone’s favorite Chinese buns and pastries. Most people love the pineapple buns (bo luo bao) and praise the crunchy sweet topping. However, I was an exception and preferred the light, fluffiness of the bread over the topping. Luckily, my brother was like most people, so I’d trade him the topping of the bun for the fluffy bread. 🙂

For years, I’ve been mystified by how those buns were always so fluffy, thinking those Chinese ladies in those bakeries had some magical powers. Recently, through thorough searching on the internet, I’ve discovered their secret to achieving such soft, fluffy bread. Apparently, it’s tangzhong, a scalded dough that helps keep the bread soft.

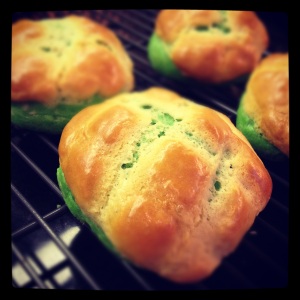
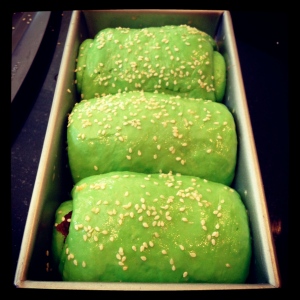
I thought I’d jazz the bread up a bit by adding a few drops of Pandan extract that I had bought from the local asian grocery store. Be careful to only add a couple of teaspoons since the extract is very intense. As you can see from above, it turned the white dough into a dark, green color. Alien dough anyone?

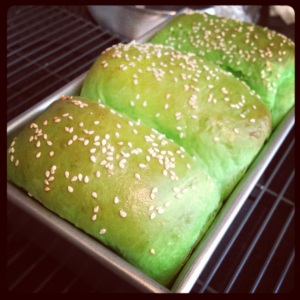
First, I decided to make loaves of Pandan bread. I think I let the dough rise too long, so the rolls were pretty huge and I could only fit in three rolls of bread into my loaf pan. Since I was going all out, I decided to add a layer of red bean paste inside the bread and a heavy sprinkling of sesame seeds on top. The bread baked beautifully, rising out of the pan and browning on top. However, make sure to bake it long enough. Deceived by the browned top, I took the loaf out too early and certain parts of the inside, specifically the parts of the rolls that joined together, were not cooked enough. But most of the bread was perfect, so soft and fluffy!

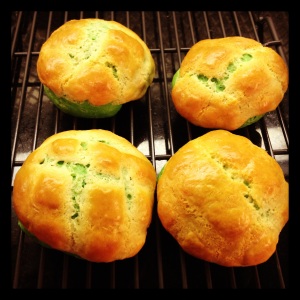
With the leftover dough, I made pineapple buns. My brother found this recipe for the infamous pineapple topping (in US units! yay!), which actually has no pineapples in it. 😛 Instead, it’s a mixture of eggs, sugar, butter, and flour. After I had placed the flat, round disks of topping (rolled out by my wonderful brother) onto the buns and scored the tops, I realized that the buns looked exactly like little turtles! So cute!

Once I took the buns out of the oven, my mom quickly grabbed one and took a bite. Ignoring my protests that they needed to cool, she countered that buns always taste best fresh out of the oven. I definitely cannot argue with that. So listen to my mother and eat these right after you take them out of the oven!

Although this bread and these buns are a lot of work (and waiting), they are definitely worth it. Your friends and family will not believe you when you say you made them yourself because they look exactly like store-bought Chinese bakery buns. My mom was so amazed that she wanted me to make them whenever we have guests over. Your mom wanting to show off your buns is definitely the best form of flattery. (If you got that pun, get your mind out of the gutter! haha)

But the most satisfying part of making the bread and pineapple buns was making them with my younger brother. It may be a bit surprising, but he’s actually the baker of our family. All throughout middle school he’d bake cookies, cakes, and cupcakes for his classmates and teachers. His friends even got him a standing mixer for his birthday! Along with our mutual love for Snow Patrol, our love for baking has helped us bond and become closer siblings. Baking with my brother was so much fun that the idea of opening a family bakery crossed my mind. Maybe that’ll be my back up plan if I ever decide that grad school isn’t for me…

Soft, Fluffy Pandan Bread (Tangzhong method)
Adapted from Kirbie’s Cravings and Christine’s Recipes

2½ cups bread flour
3tbsp + 2 tsp sugar
1/2 tsp salt
1 large egg
½ cup milk
120g tangzhong (1/2 of the batch made from this recipe)
2 tsp instant yeast (I used dry active yeast and it worked fine. I made sure to proof the yeast first with 1/4 cup warm water and 1 tbsp of sugar.)
3 tbsp butter (cut into small pieces, softened at room temperature)
2 tsp pandan paste

1. Combine the flour, salt, sugar and instant yeast in a bowl of a stand mixer. Make a well in the center. Add in all wet ingredients: milk, egg and tangzhong and pandan paste. Knead until your dough comes together and then add in the butter and continue kneading.  Keep kneading until the dough is smooth, not too sticky on the surface and elastic. (Kirbie’s recipe says she kneaded the dough for about 18-20 minutes. I didn’t knead it quite that long, probably only 10-15 min. But I forgot to do the window pane check, so not sure if my dough was actually kneaded long enough. Whoops!)
2. Knead the dough into a ball shape. Take a large bowl and grease with oil.  Place dough into  greased bowl and cover with a wet towel. Let it proof until it’s doubled in size, about 40 minutes.
3. Transfer to a clean surface. Divide the dough into four equal portions. Knead into balls.  Cover with cling wrap, let rest for 15 minutes.
4. Roll out each portion of the dough with a rolling pin into an oval shape.  Take one end of the dough and fold to meet the middle of the oval. Take the other end and fold to meet on top. (Check out Kirbie’s website for step-by-step pictures. These really helped me a lot when I was rolling the dough).
5. Flip dough over with the folds facing down,and flatten dough with rolling pin. Flip dough over so the folds face up. (If you want, slather on a layer of red bean paste like I did here). Now roll the dough up. Place each of the rolls into the bread pan and put a piece of plastic wrap over the rolls. Let them rise until double the size, approximately another 40 minutes. (Since I was busy making the pineapple buns, I probably let the dough rise a lot longer… oops).
6. Beat an egg and brush egg mixture on top to create shiny egg wash finish. Sprinkle sesame seeds on top!
7. Bake at 330 degrees F for approximately 30 minutes.

Pineapple Buns and Topping
Adapted from Homemade Chinese (I only used half of the topping)

Pandan dough (from above)
2.5-3 tbsp sugar
1/8 cup butter
1 egg yolks
1/4 tsp baking soda
1 tbsp milk
1/2 cup flour
1 tsp baking powder

How to Prepare Topping:
1. Beat the butter and sugar until creamy and fluffy.
2. Add egg yolk, baking soda, and milk together, and mix well.
3. Sift the flour and baking powder into the butter mixture, and mix by hand until it’s smooth and not sticky. Be careful not to manipulate it too much as it will form gluten (we didn’t really see this step and didn’t notice any gluten forming)
4. Wrap the topping in plastic and refrigerate it for an hour and a half minimum.

How to Make Pineapple Buns:
1. Shape dough into equal sized balls, cover with plastic wrap, and let rise for at least 15 min.
2. Take the prepared pineapple topping and roll it to a thickness of about 1-1.5 in.
3. Brush the buns with a small amount of water, and place the pineapple topping ontop of the buns. The water will help the topping stick to the buns.
4. Take a knife and lightly score the toppings with a criss-cross pattern.
5. Lightly beat 1 egg yolk and brush the buns and toppings with it. The egg yolk will provide the buns with a nice rich yellow color.
6. Bake the buns at 375 degrees Fahrenheit for 10 min.
7. Let cool slightly, then devour!

This post has been Yeastspotted.

Fun for the party – Funfetti Cookie Sandwiches

At the last minute, I decided to bake something for my department’s graduation party. Since I wanted to make something festive and didn’t have much time, I knew these  Funfetti Sandwich Cookies from Baked Perfection would be perfect! This recipe uses store-bought cake mix, making it great for when you’re short on time, but still want to make something for a party.

For a while, I was a bit snobby and didn’t like to follow recipes that used store-bought ingredients, like cake mix or frosting. But sometimes, you just want to bake something quick without too much effort. For this reason, I sometimes buy break-and-bake cookies, just to satisfy my baking needs. (My favorite kind is Immaculate Baking Co. Triple Chocolate Cookie Dough). So even though this recipe uses store-bought cake mix, I actually really like it… but maybe that’s because I was crunched for time. 😛

The recipe is so simple that you don’t really have to think about anything. Just add 2 eggs, 1/3 cup of vegetable oil, 2 tablespoons of milk, and 1 teaspoon of vanilla to the cake mix. Stir until combined and bake. To be honest, the hardest and most time consuming part was spooning out all of the teaspoon sized cookies onto the baking sheets. And to speed this recipe up even more, I didn’t make my own frosting and just used store-bought cream cheese frosting instead.

As I was assembling the cookie sandwiches, I realized that this is a great recipe for kids to help out with. Kids could definitely handle this recipe since it only requires stirring in a few ingredients. Also, I can see kids having a great time making the sandwiches and rolling them in sprinkles. Even though I didn’t start early in the kitchen, I think it’s great when kids help out with cooking or baking. A lot of people dislike cooking and treat it as a chore. But I believe if you start cooking with your kids early and show them how much fun it is, they’ll enjoy cooking all throughout their lives.

These funfetti cookie sandwiches were definitely delicious given how quickly people devoured them at the party, which is always a good sign. And even though I don’t often like to use store-bought mixes, it’s nice taking a little shortcut to save time once in a while.

Curryin’ it up – Easy Red Curry

I’ve recently realized just how easy it is to make curry. Why have I been so ignorant? Curry is basically a stir fry using whatever vegetables and meat you want with red, green, or yellow curry. Excited to try my hand at curry, I bought a small can of red curry paste from our local Asian grocery (about $1.50) and a can of coconut milk from Trader Joes (only $0.99!).

Curry is a great way to use up leftover veggies you have in your fridge. That night, I had  some mushrooms, an orange bell pepper, and bean sprouts on hand. I also added some canned baby corn and water chestnuts for a nice crunch as well as tofu, frozen peas, and broccoli.

I’m the kind of person who doesn’t really like to follow recipes, especially when it comes to cooking. I like to read a couple of recipes for the dish I want to make, follow the basic guidelines, and then add my own touches. I almost never have exactly all the ingredients the recipe calls for, and I’m often too lazy to go out and buy what’s missing. So I end up improvising – either leaving something out or replacing it with something else. This is one of the reasons why I love this curry dish. You can use whatever you have on hand and you won’t ever feel bad that you were missing an ingredient.

I’m also not a firm believer in accurate measurements when it comes to cooking. For baking, yes, you do need to measure ingredients or else you might end up with too dense or dry of a cake or too chewy or crispy a cookie. Cooking, on the other hand, depends only on your tastes. So I usually never measure out things when I’m cooking for myself since it’s only my tastes that I have to worry about. However, when I’m cooking for other people, I try to follow recipes, but oftentimes that doesn’t work out. Guess I’m just a rebel at heart. 😛


For these reasons, I’m not really posting a recipe… because I don’t really have one. Making this dish is really really simple and takes about 5 steps:

1) Cut up some of your favorite meat (or tofu) and veggies or whatever you have in your fridge that day.
2) Heat up a pan with some oil and fry some curry paste. (I’m kinda a wimp when it comes to spicy food, so I used about a spoonful).
3) Add some coconut milk, about half a can. Or you can add the whole can if you’d like.
4) Throw in the meat (or tofu) and veggies and wait until they’re cooked. You can stir them occasionally to coat the veggies in the curry sauce.
5) Cook some rice or noodles and place your curry on top. Or if you’re too lazy to do that, just enjoy the curry by itself (which is what I did and it was delicious!). Don’t forget to garnish with cilantro (unless you hate it, of course)!

So I guess that was a recipe, but a pretty vague one. Sorry to those of you who like specific instructions. If you’d like a real recipe for curry, here’s a few from 101 Cookbooks,  allrecipes, and Epicurious.

As I cook more and more, I’m realizing that cooking is a lot like life. Sometimes, you won’t always have what you want or need in a certain situation. But you gotta roll with the punches and make the best with what you have. Like they always say, when life hands you lemons, make lemonade. Or in this case, when you’ve got a can of curry paste, make whatever kind of curry you want.

Love it or Hate it – Cilantro Rolls

People either love cilantro or hate it. I fall in the category of people who absolutely love cilantro. It has such a crisp and refreshing taste! I love buying a bunch of cilantro at the grocery store, but I can never use it all up before the leaves turn brown and soggy. Even though the gigantic bunch usually only costs about $0.40, it always saddens me when I have to throw out cilantro gone bad.

 So when I spotted this recipe from First Look, then Cook, I knew I had to try it out immediately to use up the cilantro sitting in my refrigerator. The dough is like most breads I’ve made before, except that butter is cut into the flour, just like pie crust dough. I’d suggest using bread flour if you have it. I accidentally used whole wheat pastry flour, thinking it’d be fine. But since pastry flour doesn’t have as much gluten as all-purpose or bread flour, it took forever for the bread to toughen up. Luckily, I remembered I had some bread flour. Once I added that, the dough toughened up quickly and was much easier to knead. Also, this dough refrigerates pretty well. Just make sure you let it warm back up to room temperature before using it again. I let it warm up and rise a bit again since I was worried I might get hard rolls.


One of my favorite things about making yeasted breads is the kneading and rolling step. The feel of the dough, the motion of pushing and folding the dough, and the smell of fresh dough… they all mesmerize me. In fact, they mesmerize me so much that I often forget everything else going on and focus only on the dough in front of me. It’s a great way to clear your mind. Not to mention, the physical effort of kneading and rolling allows you to release any pent-up anger.

I brought these rolls to a barbecue (they’re just as popular here as in Texas!) and they were a hit! People were intrigued once I set them down on the table, guessing they were pesto rolls. I omitted the sesame seeds, since I didn’t have any on hand. These cilantro rolls are so easy to make and can be a great dish to bring to a party or a nice addition to a weeknight dinner.

This post has been Yeastspotted.

Only the Best for Mom – Brioche French Toast

For Mother’s Day, my brother decided to make my mom french toast. Wait before you dismiss this as just a regular old french toast recipe (like I did). The little details of this recipe really make this french toast better than any you’ve ever had.

My friend Rachel, who spent a year studying in France, once told me that french toast is actually the French dish, pain perdu or “lost bread.” People would soak their undesirable, old, hard bread in the egg/milk mixture to recover the moistness that it had already lost. However, American culture has transformed pain perdu into one of the most desirable breakfast dishes. So attractive that we no longer use old bread, but instead fresh bread, defeating the original purpose of the dish and often times making a soggy french toast. But this recipe helps to remedy that by toasting the bread before soaking it. This made a big difference as did the type of bread used. Challah is suggested, but we used brioche, which resulted in a rich, buttery french toast that was absolutely delicious. However, I had to stop eating after one piece of toast due to its richness.

My brother had the brillant idea of adding macerated mixed berries to the dish, which helped cut some of the rich flavor of the toast. By adding sugar to the fruit, you create a concentration gradient, with a higher concentration of sugar outside of the fruit than inside the fruit. As a result, the fruit release its juices to achieve chemical equilibrium. Being a chemical engineering student, I love it when I can explain real-life phenomena using concepts I’ve learned in school. 😀 Anyways, getting back to the food, the macerated berries were delicious and add a nice touch to the already amazing french toast.

This french toast was a great dish to make for our mom for Mother’s Day. But don’t wait for a special day like that to try it out. It’s a great and easy recipe that will make you feel like you’re eating brunch at a fancy bistro instead of at home.

Note: This recipe comes from America’s Test Kitchen. Unfortunately, they don’t post the recipe online unless you have a subscription, but you can watch how to make it here.

This post has been Yeastspotted.

Wandering and Stumbling

One of my favorite things to do is to just wander around my city and discover new places. I love stumbling upon local events going on that day or night, from summer festivals to monthly art walks in various neighborhoods. Luckily, there’s always something going on in the Bay Area, so there’s no such thing as an ordinary day or night.

In early March, my friend and I went to Souley Vegan in Oakland to use up an expiring groupon. After dinner, we walked along Broadway into the uptown area, and stumbled upon an event in which boutiques and art galleries stay open later. For the Austinites out there, it’s like First Thursdays but much smaller. After window shopping at some cute boutiques, we walked into a crowded store hosting a free concert. Although the music didn’t suit my taste, just the energy and environment made it worth staying.

I met up with my friend again last week to use up another groupon, this time to Parada 22, a Puerto-Rican restaurant on Haight St. Our dinner of mofongo and bistec were delicious, but the real highlight of the evening was stumbling upon a retro soda fountain/ice cream parlor called The Ice Cream Bar.

It was like stepping back in time to the ’50s. Lined all along the back wall were tinctures and extracts of every kind of flavor and herb, from cilantro to cinnamon to hellfire, for concocting archaic drinks such as acid phosphates and lactarts. Although the drinks sounded so appetizing and exotic, we refrained from ordering them and settled on sharing a scoop of banana pudding ice cream. As we enjoyed our ice cream, we asked the soda jerk about all of those exotic drinks and got quite an education about old-school sodas, from egg-creams to phosphates and lactarts. All of the drinks on the menu looked delicious, but the most eye-catching ones were the “World’s Best Milkshake,” a pistachio milkshake made from Sicilian pistachios that are only harvested one day out of the year, and a lactart containing chai and tobacco (as a spray). If you are ever in the Cole Valley district of San Francisco, definitely check out this place! Going on little adventures like these, discovering new places and new people, is so satisfying, just like the perfect scoop of ice cream.

Tecate Cupcakes

This past weekend was definitely festive with both the Kentucky Derby and Cinco de Mayo falling on the same day. To celebrate, my friends had a Cinco de Mayo barbecue featuring carne asada, grilled pineapple, and of course, margaritas! I was planning on making margarita cookies from this recipe I saw on Smitten Kitchen. But I didn’t have any tequila on hand and didn’t think it’d be worth it to buy a bottle if I was only using a few tablespoons. (I guess I could have saved the rest for margaritas and tequila shots :P)

So instead, I decided to make Corona cupcakes from this recipe on Erica’s Sweet Tooth. But since I couldn’t find any Corona in our house, I used Tecate instead. The recipe is a pretty standard cupcake recipe, except that it uses beer for moisture instead of milk or water. Although I couldn’t really taste the beer and I’m pretty sure none of my friends noticed it, the cupcakes were still delicious!

I was a little too lazy to make my own cream cheese frosting, so I just added the zest and juice of one lime to some leftover store bought frosting sitting in my refrigerator. I think it was really the frosting that did it for me. Yes, the cupcake is super moist and tasty, but the frosting is what made me want to eat another. The zest and juice really packed a lot of flavor into the frosting without making it too sour. I’ll probably make it again for another cake/cupcake in the future since it was so good (and super easy to make).

These cupcakes are a great way to celebrate Cinco de Mayo or kick off summer! Which I can finally do, now that my finals are over! 😀 However, life as a grad student doesn’t include any summer vacation – only long hours in the lab. Call me a nerd, but I’m super excited about it!

Tecate/Corona Cupcakes
Recipe adapted from Erica’s Sweet Tooth and Miss Make

For the cupcakes:
3/4 cups unsalted butter, at room temperature
1-3/4 cup sugar
2-1/2 cup flour
2 tsp baking powder
1/2 tsp salt
3 eggs, at room temperature
1 tsp vanilla
1/2 tsp lime zest (I used the zest of one lime)
1 cup Blue Moon or Corona or Tecate beer, plus more for brushing on tops
1/4 cup milk
Lime wedges and sanding sugar for garnish (I skipped this)

1. Preheat oven to 375 degrees and line 24 muffin tins with cupcake liners.
2. In a medium-sized bowl, whisk together flour, baking powder, and salt.
3. In the bowl of an electric mixer, beat together the butter and sugar until light and fluffy, about 2-3 minutes.
4. Add eggs, beating after each addition then add the vanilla and zest. (I apparently can’t read, and added all of the eggs in at once. They turned out fine)
5. Combine milk and beer and alternatively add this mixture and the flour mixture to the butter/sugar mixture with the mixer on low speed, starting and ending with the flour.
6. Fill the cupcake liners 2/3 full and bake for 18 minutes, or until cake tester comes out clean. (I made 13 regular sized cupcakes and 32 mini-cupcakes)
7. When cupcakes are done, poke holes in the tops of the cupcakes with toothpicks and brush some beer on each while still warm. (I tried doing this, but the spooned the beer on top instead. It didn’t really work since the beer just spilled over the cupcake. It probably works better brushing the beer on top, but this step doesn’t really seem to be that necessary)
8. Let cupcakes cool and frost with lime cream cheese frosting.

For super easy lime cream cheese frosting:
1/4 cup store bought cream cheese frosting
Zest and juice of one lime

1. Add lime zest and juice to cream cheese frosting
2. Stir until get desired consistency.

Backup Babka – Chocolate Cinnamon Babka

I never really watched Seinfeld, but I have heard of some of the more famous things on the show, like the infamous Soup Nazi and chocolate and cinnamon babka. This recipe from the Purple Foodie combines both chocolate and cinnamon babka, and perhaps elevates the “lesser” cinnamon babka.

I hadn’t even planned on making babka. I was set on making Makowiec, a Polish poppy seed roll, for my friend’s Easter dinner that was featuring many traditional Polish dishes. But because I couldn’t find poppy seed filling at the grocery store and was too lazy to make my own, I had to come up with another Polish-ish baked good. Babka seemed to be the best choice due to its aesthetic qualities and tastiness.

I made two smaller loaves, one shaped in a twisted ring and the other a more conservative ring with slits. The babka was delicious and reminiscent of cinnamon rolls. Because I ran out of chocolate and forgot to add sugar to the filling (oops!), I decided to add a cream cheese glaze to one of the rolls, which made it even more like a cinnamon roll. Fortunately, despite my mistake, no one seemed to notice and everyone praised the babka. (However, it did get overshadowed by a delicious, rich sea salt chocolate ganache.) The babka’s popularity didn’t really matter to me. I was just satisfied with the fact that I had accomplished another yeast bread.

Chocolate Cinnamon Babka
From The Purple Foodie (who adapted it from Peter Reinhart’s Artisan Breads Everyday)
Makes 1 really large loaf or two medium sized loaves.

Bread:
2 tbsp instant yeast
3/4th cup lukewarm milk
6 tbsp butter
6 tbsp sugar
1 tsp vanilla extract
4 egg yolks
3 1/2 cup all-purpose flour
1 tsp salt

Filling:
1 1/2 cups dark chocolate, coarsely chopped
1 tsp cinnamon
1/4 cup butter

(If you run out of chocolate like I did, you can make a cinnamon filling, but be sure to add sugar or else you’ll just taste ground cinnamon.)

1. Whisk the yeast into lukewarm milk and set aside for about 5 minutes. (For some reason, the yeast didn’t like it when I mixed it with milk, so I used water instead)
2. In a large bowl, cream together the sugar and butter until smooth.
3. Add the yolks to the bowl, one at a time, mixing constantly for 30 seconds between each addition.
4. Add the vanilla and mix until light and fluffy.
5. Add the flour and salt and continue to mix until it all comes together.
6. Now mix in the milk + yeast mixture and let it mix until it forms a soft dough.
7. Knead by hand for another 2-3 minutes. You will have a soft, supple and golden dough.
8. Let the dough rise for about 2 hours, or refrigerate overnight, making sure to remove it from the fridge two hours before baking.
9. For the filling: mix the chocolate, butter and cinnamon together in a bowl.
10. Once the dough has risen, roll it out into a sheet with a thickness of 1/8 to 1/4 inch.
11. Spread the chocolate mixture over it.
12. Roll the sheet of dough and then pinch the seams to seal it. Roll it to a length of about 24 inches. Either you can keep it this big if you’d like a big loaf, or cut it into half for two medium loaves.
13. For the gorgeous twisty shape, cut the log down the middle lengthwise, making sure to keep the top end attached. Twist over each other to get the braided look.
14. Let the loaves prove for another 2 hours. (This isn’t necessary since The Purple Foodie skipped this step and her loaf turned out fine).
15. Preheat the oven to 350F and bake for 15-20 minutes for medium sized and 20-25 minutes for the large loaf. The babka tends to brown quickly because of the high(er) sugar content.
16. Cool for an hour (painful) or eat it right away (delightful!)
The bread stays good for 2-3 days in an airtight box.

This post has been Yeastspotted.