
Nailing it on Pinterest – Sweet Sweet Potatoes

The most popular, most liked, and most pinned pin on my Pinterest board is this recipe for White Sweet Potatoes with Mirin and Honey from Bon Appetit. It’s a bit shocking to me that over 150 people have some how found my pin and repinned it. I mean, these potatoes do look delicious, but I didn’t think they looked THAT delicious.

I had always wanted to try this recipe, but since so many people have taken an interest in it, I decided that I really ought to try it out. So, I bought white sweet potatoes one day and tried to follow the recipe. Per instructions, I microwaved the potatoes and let them steam in a glass bowl. That’s where it started going downhill. The skins didn’t fall off easily like the recipe said they would. So instead, I had to cut off the skins, which was pretty difficult since the potatoes were rather mushy from steaming. I managed to get some rounds, coated them with the glaze, and baked them in the oven. But I wasn’t able to achieve the same degree of caramelization. Maybe it was because I used a baking sheet instead of a cast iron skillet? Anyways, the potatoes tasted good, but they definitely did not look as good as those in the picture.

A few weeks later, I decided to try again, but this time with orange yams. I modified the recipe by peeling the potatoes first and then slicing them into rounds. I placed them on a baking sheet to roast for 15 minutes and then coated them in the glaze. This time, I placed them in a glass pie pan and baked them. The potatoes seemed a bit more caramelized and looked a bit more like the picture. However, I thought they were a little too sweet.

These potatoes went well with my Asian-themed dinner of miso glazed cod on a bed of brown rice and sauteed shiitake mushrooms with kale. However, I don’t think they were really as good as they look from the recipe. And they definitely were not worthy of having 150+ people repinning the recipe. But that might be due to my poor execution since Jen from use real butter made amazing looking potatoes. Ā Oh well, maybe the third time is the charm? At least I tried something from Pinterest, even though I didn’t exactly nail it. šŸ˜›

Childhood Nostalgia – Red Bean Buns

Growing up, I ate a lot of red beans. No, not the savory kind used in rice and beans, but the sweet kind commonly found in Asian desserts. Sweet red bean soup served after dinner and soft buns filled with red bean paste were some of my favorite desserts. Anytime I saw red bean anything being offered, my eyes would widen and I’d choose it immediately.

So when I saw this recipe for red bean buns, I knew I had to make them. To make the dough, I used the same recipe for soft, fluffy bread using the tangzhong method. I used canned red bean paste, but you could make your own. To make the rolls, you simply enclose a small ball of paste with a circle of the dough, then roll out the dough ball into a flat oblong shape. The funnest part was cutting slits into the dough, but make sure not to cut too deep or else you’ll end up with strings of red bean buns. Simply roll the dough up (hot dog style), brush with egg wash, and sprinkle with sesame seeds.

These red bean rolls bake and brown beautifully. My mom, lover of hot out of the oven baked goods, quickly snatched up a roll once I brought the tray out of the oven.

She was so impressed by these rolls and exclaimed that they looked exactly like those sold in Chinese bakeries. My friends reinforced this when I brought them the rolls the next day. I’m pretty sure if I had packaged the rolls in one of those pink boxes the Chinese bakeries use, no one would have guessed the rolls were homemade.

Since moving away from home for college and now grad school, I rarely eat any kind of Chinese food. I suppose the overexposure to it growing up as a kid has resulted in my avoidance of Chinese restaurants as an adult. Although I do enjoy certain Chinese dishes, I usually prefer to eat other Asian cuisines, especially Korean, Japanese, and Thai. However, these red bean rolls were so delicious that I could resist eating them or deny that they were amazing. Plus, they brought me back to my childhood and let meĀ indulgeĀ in a bit of nostalgia.

Like childhood, theseĀ buns are pretty simple,Ā even though they may seem rather complex. They’re also super light and fluffy, just like how life felt as a kid. Not yet weighted by the burdens of adulthood, kids can fly as high and as far as they want. Hopefully, in producing bakery-worthy goods, these red bean buns will make you feel like that once again. šŸ™‚

Red Bean Buns
Adapted from Happy Home Baking

Dough for soft, fluffy bread (follow this recipe just omit the pandan extract)
1 can of red bean paste, roll into balls of equal size
1 egg for egg wash
White sesame seeds (optional)

  1. After the dough has risen, divide the dough into equal sized portions (the number can vary depending on the size). Roll each portion into a ball and let them rest for 10-15 minutes.
  2. Flatten the dough into a round disc. Enclose each red bean paste ball with a flat disc of dough. Pinch and seal the seam tightly. Flatten the dough into a round disc and roll out into a longish oval shape. Use a knife to make a few slits, but don’t cut all the way through. Roll up into an oblong roll, then seal and pinch the edges.
  3. Place the rolls, seam side down on a greased baking tray. Leave some space in between the rolls to allow them to expand. Let the rolls proof for the second time for about 45 mins, or until they double in size.
  4. Brush the tops with egg wash and sprinkle white sesame seeds on top.
  5. Bake in pre-heated oven at 350F for 15 mins or until golden brown. Remove from oven and let cool on cooling rack.

This post has beenĀ Yeastspotted.

Picnic Time – Korean Style with Kimbap and Egg Roll Ups

The first time I tried kimbap, I was actually in China. I had been living there for a month already, and although I enjoyed eating Chinese food, I was getting a little sick of eating it all the time. Luckily, I found a little shop that sold kimbap, which is sort of like the Korean version of sushi. However, kimbap usually has meat instead of fish and more vegetables than Japanese sushi. The clean, crisp taste of kimbap was a delicious and welcome break from the rather oily, heavy Chinese food I had been eating the past month.

Kimbap is the perfect on-the-go meal. I’ve read that Koreans usually pack kimbap for lunch or as a snack for hikes or picnics. You can put whatever you’d like into kimbap. Usually, the standard ingredients are carrots, spinach, pickled radish (takuan), and marinated beef (bulgolgi). I decided to use marinated baked tofu instead of beef and added in some strips of egg. I loosely followed these recipes from Serious Eats and spoon fork bacon.

Making kimbap is pretty straightforward. Cook the rice and add in some rice wine vinegar and sugar. Saute the vegetables (spinach and carrots) and slice all of your ingredients into strips. Place a sheet of seaweed onto your sushi mat and pat rice on top. Lay all of the ingredients in rows on top of the rice and roll. Pretty simple, right? However, don’t underestimate how long it’ll actually take you. It took me about an hour to make the kimbap. The rolling was the hardest part since all the ingredients start flying out as you roll.

The best tip I found for making kimbap was coating the knife in sesame oil before cutting the roll into slices. This step made it so much easier to cleanly cut through the seaweed and rice.

Another cute snack food to pack on picnics is egg roll ups. They’re basically an egg pancake with chopped vegetables (usually carrots and green onions) that’s been rolled up. The recipe I used is based off this one. It’s so simple!

Whisk together eggs (one or two) and chopped carrots and green onions. Then pour mixture into a pan and swirl to get a circle with even thickness. Flip the pancake once the eggs have set and cook for another minute or two. Slide the pancake onto a plate and quickly roll the pancake up. Let cool for 5 minutes, then slice and serve.

The egg roll ups are much easier to make than kimbap since they only have a few ingredients. But like kimbap, rolling is the hardest part. To get the shape to stay, you have to quickly roll the egg pancake while it’s still hot and let it cool as a roll before cutting into it.

Since both kimbap and egg roll ups are eaten cold, they’re the perfect snack to take on a hike or picnic. One Saturday, my friends and I planned to go to a local chalk art festival held in Berkeley. Since it was such a beautiful day, I figured it’d be fun to have a picnic in the park where the festival was being held and decided to pack up kimbap and egg roll ups.Ā My friends loved them and were so impressed! If you want to try a new picnic dish that’s simple and easy while still being impressive, definitely make kimbap and egg roll ups. Everyone, from kids to adults, will love these rolls of deliciousness!

Dinner Partying it up – Japchae (Korean glass noodles)

Inspired by all these beautiful recipes I’ve seen on some of my favorite blogs, I decided to try to make some of them and throw a dinner party. For some reason, I have an inclination to cook Asian dishes more than other cuisines. So, on the menu were mostly Asian or Asian-inspired dishes: japchae (Korean glass noodles), chicken fried rice, mirin and honey sweet potatoes, bean sprout kimchi, pickled vegetables, and stuffed peppers with Thai curried rice.

IĀ had originally planned to make a few more dishes, including miso glazed cod. However, halfway through making dinner, I realized I had definitely bit off more than I could chew. SoĀ I decided to save those for another dinner party and serve the dishes I was really dying to make, specifically japchae, which turned out to be the star of the dinner.

Korean cuisine is probably my favorite. I love it so much that I can never refuse an invitation to eat Korean BBQ or go to a Korean restaurant. However, it can be a bit pricey and I’ve recently realized that many Korean dishes are fairly easy, especially japchae. After hearing one of my friends proclaim her love for the noodle dish too, I decided that I had to give it a shot and make them for her.

The recipe is basically a stir-fry of sweet potato noodles and vegetables. Usually, beef is included, but since I didn’t have any at hand, I left it out. For my veggies, I used onions, carrots, shiitake mushrooms, bell pepper,Ā zucchini, and spinach. But I’m sure you can use whatever vegetables you like. I didn’t actually follow the recipe that closely. Like I’ve said before, I like to play it by ear when it comes to cooking. So I don’t actually know how much of the ingredients I used. I just eyeballed it and put in however much looked right to me. Also, I was a little surprised to see that the sauce was only soy sauce with sugar. How can you get more simple than that for something so delicious?

My friends loved the japchae! As we ate, they gave so many compliments that I felt a bit silly accepting them, since the dish was so easy. This is definitely a dish that I will make again and again, and so should you! Not only is it super easy and straightforward, but also super delicious (and tastes just like japchae ordered from a Korean restaurant)! Now that I can make it myself, I will probably never order japchae at a restaurant again.

That’s one of the things I love the most about cooking (and baking) – it gives you the ability to be self-reliant and self-sufficient. Because you learn how to make things yourself, you no longer have to rely on other people to make it for you. It’s similar to that old adage: “Give a man a fish, feed him for a day. Teach a man to fish, feed him for a lifetime.” Learning how to cook a dish will literally enable you to feed yourself for a lifetime.

Japchae (Korean Glass Noodles)
Adapted from Steamy Kitchen

1/2 pound dried Korean sweet potato noodles (I just used the whole bag)
2 1/2 teaspoons sesame oil, divided
1 tablespoon oil
3/4 cup thinly sliced onions (I used half an onion)
2 carrots, cut into matchsticks
2 cloves garlic, finely minced (I forgot this! whoops!)
3 stalks green onions, cut into 1ā€³ lengths (I only added one stalk)
1/2 cup mushrooms, thinly sliced shiitake (I used a small bag of dried shiitake)
1/2 lb spinach, washed well and drained (I don’t think I used this much…)
2 tablespoons soy sauce (I tripled this)
2 teaspoons sugarĀ (I tripled this)
1 tablespoon sesame seeds

Fill a large pot with water and boil. When water is boiling, add the noodles and cook for 5 minutes. Immediately drain and rinse with cold water. Drain again and toss with only 1 tsp of the sesame oil. Use kitchen shears to cut noodles into shorter pieces, about 8 inches in length. Set aside.

In bowl, mix soy sauce & sugar together. Add the cooking oil in a wok or large saute pan on high heat and swirl to coat. When the cooking oil is hot but not smoking, fry onions and carrots, until just softened, about 1 minute. Add the garlic, green onions and mushrooms, fry 30 seconds. Then add the spinach, soy sauce, sugar and the noodles. Fry 2-3 minutes until the noodles are cooked through. Turn off heat, toss with sesame seeds and the remaining 1 1/2 tsp of sesame oil. Enjoy!

Soft and Fluffy – Pandan Bread and Pineapple Buns

Being Chinese-American, I’ve been to a lot of Chinatowns, dim sum restaurants, and of course, Chinese bakeries. Whenever we visited my relatives in Oakland, we’d always go to Chinatown. And if we didn’t happen to eat dim sum that morning, we’d always go to my mom’s favorite bakery to buy a big pink box filled with everyone’s favorite Chinese buns and pastries. Most people love the pineapple buns (bo luo bao) and praise the crunchy sweet topping. However, I was an exception and preferred the light, fluffiness of the bread over the topping. Luckily, my brother was like most people, so I’d trade him the topping of the bun for the fluffy bread. šŸ™‚

For years, I’ve been mystified by how those buns were always so fluffy, thinking those Chinese ladies in those bakeries had some magical powers. Recently, through thorough searching on the internet, I’ve discovered their secret to achieving such soft, fluffy bread. Apparently, it’sĀ tangzhong, a scalded dough that helps keep the bread soft.

I thought I’d jazz the bread up a bit by adding a few drops of Pandan extract that I had bought from the local asian grocery store. Be careful to only add a couple of teaspoons since the extract is very intense. As you can see from above, it turned the white dough into a dark, green color. Alien dough anyone?
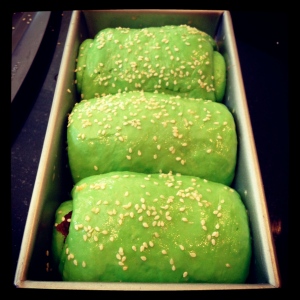
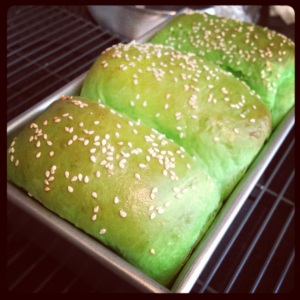
First, I decided to make loaves of Pandan bread. I think I let the dough rise too long, so the rolls were pretty huge and I could only fit in three rolls of bread into my loaf pan. Since I was going all out, I decided to add a layer of red bean paste inside the bread and a heavy sprinkling of sesame seeds on top. The bread baked beautifully, rising out of the pan and browning on top. However, make sure to bake it long enough. Deceived by the browned top, I took the loaf out too early and certain parts of the inside, specifically the parts of the rolls that joined together, were not cooked enough. But most of the bread was perfect, so soft and fluffy!
With the leftover dough, I made pineapple buns. My brother found this recipe for the infamous pineapple toppingĀ (in US units! yay!), which actually has no pineapples in it. šŸ˜› Instead, it’s a mixture of eggs, sugar, butter, and flour. After I had placed the flat, round disks of topping (rolled out by my wonderful brother) onto the buns and scored the tops, I realized that the buns looked exactly like little turtles! So cute!

Once I took the buns out of the oven, my mom quickly grabbed one and took a bite. Ignoring my protests that they needed to cool, she countered that buns always taste best fresh out of the oven. I definitely cannot argue with that. So listen to my mother and eat these right after you take them out of the oven!
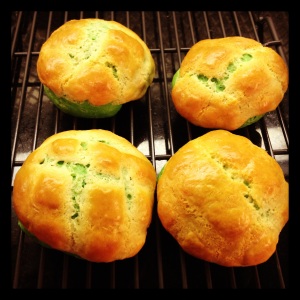
Although this bread and these buns are a lot of work (and waiting), they are definitely worth it. Your friends and family will not believe you when you say you made them yourself because they look exactly like store-bought Chinese bakery buns. My mom was so amazed that she wanted me to make them whenever we have guests over. Your mom wanting to show off your buns is definitely the best form of flattery. (If you got that pun, get your mind out of the gutter! haha)

But the most satisfying part of making the bread and pineapple buns was making them with my younger brother. It may be a bit surprising, but he’s actually the baker of our family. All throughout middle school he’d bake cookies, cakes, and cupcakes for his classmates and teachers. His friends even got him a standing mixer for his birthday! Along with our mutual love for Snow Patrol, our love for baking has helped us bond and become closer siblings. Baking with my brother was so much fun that the idea of opening a family bakery crossed my mind. Maybe that’ll be my back up plan if I ever decide that grad school isn’t for me…

Soft, Fluffy Pandan Bread (Tangzhong method)
Adapted from Kirbie’s Cravings and Christine’s Recipes

2Ā½ cups bread flour
3tbsp + 2 tsp sugar
1/2 tsp salt
1 large egg
Ā½ cup milk
120g tangzhong (1/2 of the batch made from this recipe)
2 tspĀ instantĀ yeast (I used dry active yeast and it worked fine. I made sure to proof the yeast first with 1/4 cup warm water and 1 tbsp of sugar.)
3 tbsp butter (cut into small pieces, softened at room temperature)
2 tsp pandan paste

1. Combine the flour, salt, sugar and instant yeast in a bowl of a stand mixer. Make a well in the center. Add in all wet ingredients: milk, egg and tangzhong and pandan paste. Knead until your dough comes together and then add in the butter and continue kneading.Ā  Keep kneading until the dough is smooth, not too sticky on the surface and elastic.Ā (Kirbie’s recipe says she kneaded the dough for about 18-20 minutes. I didn’t knead it quite that long, probably only 10-15 min. But I forgot to do the window pane check, so not sure if my dough was actually kneaded long enough. Whoops!)
2.Ā Knead the dough into a ball shape. Take a large bowl and grease with oil.Ā  Place dough intoĀ  greased bowl and cover with a wet towel. Let it proof until itā€™s doubled in size, about 40 minutes.
3. Transfer to a clean surface. Divide the dough into four equal portions. Knead into balls.Ā  Cover with cling wrap, let rest for 15 minutes.
4. Roll out each portion of the dough with a rolling pin into an oval shape.Ā  Take one end of the dough and fold to meet the middle of the oval. Take the other end and fold to meet on top. (Check out Kirbie’s website for step-by-step pictures. These really helped me a lot when I was rolling the dough).
5. Flip dough over with the folds facing down,and flatten dough with rolling pin.Ā Flip dough over so the folds face up. (If you want, slather on a layer of red bean paste like I did here). Now roll the dough up. Place each of the rolls into the bread pan and put a piece of plastic wrap over the rolls. Let them rise until double the size, approximately another 40 minutes. (Since I was busy making the pineapple buns, I probably let the dough rise a lot longer… oops).
6. Beat an egg and brush egg mixture on top to create shiny egg wash finish. Sprinkle sesame seeds on top!
7. Bake at 330 degrees F for approximately 30 minutes.

Pineapple Buns and Topping
Adapted fromĀ Homemade ChineseĀ (I only used half of the topping)

Pandan dough (from above)
2.5-3 tbsp sugar
1/8 cup butter
1 egg yolks
1/4 tsp baking soda
1 tbsp milk
1/2 cup flour
1 tsp baking powder

How to Prepare Topping:
1. Beat the butter and sugar until creamy and fluffy.
2. Add egg yolk, baking soda, and milk together, and mix well.
3. Sift the flour and baking powder into the butter mixture, and mix by hand until it’s smooth and not sticky. Be careful not to manipulate it too much as it will form gluten (we didn’t really see this step and didn’t notice any gluten forming)
4. Wrap the topping in plastic and refrigerate it for an hour and a half minimum.

How to Make Pineapple Buns:
1. Shape dough into equal sized balls, cover with plastic wrap, and let rise for at least 15 min.
2. Take the prepared pineapple topping and roll it to a thickness of about 1-1.5 in.
3. Brush the buns with a small amount of water, and place the pineapple topping ontop of the buns. The water will help the topping stick to the buns.
4. Take a knife and lightly score the toppings with a criss-cross pattern.
5. Lightly beat 1 egg yolk and brush the buns and toppings with it. The egg yolk will provide the buns with a nice rich yellow color.
6. Bake the buns at 375 degrees Fahrenheit for 10 min.
7. Let cool slightly, then devour!

This post has been Yeastspotted.

Curryin’ it up – Easy Red Curry

I’ve recently realized just how easy it is to make curry. Why have I been so ignorant? Curry is basically a stir fry using whatever vegetables and meat you want with red, green, or yellow curry. Excited to try my hand at curry, I bought a small can of red curry paste from our local Asian grocery (about $1.50) and a can of coconut milk from Trader Joes (only $0.99!).

Curry is a great way to use up leftover veggies you have in your fridge. That night, I had Ā some mushrooms, an orange bell pepper, and bean sprouts on hand. I also added some canned baby corn and waterĀ chestnutsĀ for a nice crunch as well as tofu, frozen peas, and broccoli.

I’m the kind of person who doesn’t really like to follow recipes, especially when it comes to cooking. I like to read a couple of recipes for the dish I want to make, follow the basic guidelines, and then add my own touches. I almost never have exactly all the ingredients the recipe calls for, and I’m often too lazy to go out and buy what’s missing. So I end up improvising – either leaving something out or replacing it with something else. This is one of the reasons why I love this curry dish. You can use whatever you have on hand and you won’t ever feel bad that you were missing an ingredient.

I’m also not a firm believer in accurate measurements when it comes to cooking. For baking, yes, you do need to measure ingredients or else you might end up with too dense or dry of a cake or too chewy or crispy a cookie. Cooking, on the other hand, depends only on your tastes. So I usually never measure out things when I’m cooking for myself since it’s only my tastes that I have to worry about. However, when I’m cooking for other people, I try to follow recipes, but oftentimes that doesn’t work out. Guess I’m just a rebel at heart. šŸ˜›


For these reasons, I’m not really posting a recipe… because I don’t really have one. Making this dish is really really simple and takes about 5 steps:

1) Cut up some of your favorite meat (or tofu) and veggies or whatever you have in your fridge that day.
2) Heat up a pan with some oil and fry some curry paste. (I’m kinda a wimp when it comes to spicy food, so I used about a spoonful).
3) Add some coconut milk, about half a can. Or you can add the whole can if you’d like.
4) Throw in the meat (or tofu) and veggies and wait until they’re cooked. You can stir them occasionally to coat the veggies in the curry sauce.
5) Cook some rice or noodles and place your curry on top. Or if you’re too lazy to do that, just enjoy the curry by itself (which is what I did and it was delicious!). Don’t forget to garnish with cilantro (unless you hate it, of course)!

So I guess that was a recipe, but a pretty vague one. Sorry to those of you who like specific instructions. If you’d like a real recipe for curry, here’s a few from 101 Cookbooks,Ā Ā allrecipes, and Epicurious.

As I cook more and more, I’m realizing that cooking is a lot like life. Sometimes, you won’t always have what you want or need in a certain situation. But you gotta roll with the punches and make the best with what you have. Like they always say, when life hands you lemons, make lemonade. Or in this case, when you’ve got a can of curry paste, make whatever kind of curry you want.