
Trying new things – Strawberry and Cream Cheese Biscuits and Scones

Ever since eating my Southern friend’s biscuits, I’ve always wanted to try to make them. However, I like to put twists on traditional dishes/recipes, so I decided to add strawberries and cream cheese to spice up the traditional biscuit.

I mainly followed Deb’s recipe for strawberry and cream biscuits, but wanting to live up to the name more, I added chunks of cream cheese into the batter.

My biscuits didn’t turn out that fluffy, possibly because of my biscuit cutting technique and the lack of shortening. I didn’t have a biscuit cutter, so I used a glass instead. People advise only pressing down into the dough; however, my glass wasn’t sharp enough to actually cut the dough, so I ended up twisting the glass a little. I know, I know, I committed a biscuit sin! I’m not exactly sure how to get really soft and fluffy biscuits, so if you have any tips, please let me know!

I may also have not kneaded the dough enough. Deb cautioned against mixing the dough too much; however, I may have taken that advice a little too far. My dough was very soft and didn’t hold its shape as well as bread dough does.

The biscuits seemed to puff up a little in the over, but deflated a bit after I took them out. Now, the biscuits weren’t hard, but they definitely were not very flaky and fluffy. I’d say they were more of a cross between biscuits and cookies.


Cute little biscuits with chunks of the cream cheese and strawberries!

Getting a little tired of tediously cutting out circles of dough, I decided to make the rest into scones. I just rolled the remaining dough into a circle, patted it down slightly, and cut it into eight triangles. I think the texture of the dough fit the scones a little better; however, these scones were not as crumbly as store-bought scones. The problem may have been that I cut the butter too much into the flour since I had smaller than the advised “pea sized” balls of butter.

Although my first attempt at biscuits and scones wasn’t as successful as I had hoped, the products were still delicious. I will (rather unwillingly) admit that I ate all of the scones throughout the week. The small size of the scone made it the perfect snack or sweet addition to breakfast.

I took the biscuits to a barbecue, where they quickly vanished within 30 minutes of opening the container. Either they were extremely delicious or people were so ravenous that no one noticed their failures as biscuits. These biscuits are the perfect example of my theory that as long as you don’t burn whatever you’re baking, it’ll taste good. After all, baked goods are just mixtures of butter, sugar, and flour. Since that combination is so delicious, even if you mess up the recipe, you’ll still end up with a pretty tasty result. Messing up really only changes the texture of the baked good anyways. So, on that note, don’t be afraid to try baking. It’s pretty forgiving and usually, you’ll end up with a yummy product (assuming you didn’t burn it :P).

This post has been Yeastspotted.

Easier than braiding hair – Braided Lemon Bread

The second I saw this recipe for braided lemon bread from Smitten Kitchen, I knew I had to make it someday. I filed it away in my brain and waited for the opportune moment. So when I made too much lemon curd for the brioche crescent rolls, I secretly did this:

What I love about this recipe is that it’s so straightforward and easy yet yields a final product that is so intricately beautiful. So beautiful, in fact, that everyone will believe that this braid was store-bought instead of homemade. For example, when I delivered the bread to my friends, they were all so impressed by it and were convinced that I had bought it rather than made it. I felt a little bad accepting their praises since it really was super easy to make.

Despite looking complicated to make, this bread is actually extremely simple. So much easier than french braiding hair, which I still can’t do. 😛 All you have to do is cut the sides into strips and alternately lay them over each other. Easy, right? Following Deb’s step-by-step photos doesn’t hurt either.

What’s also great about this recipe is that you can make the braid ahead of time, and then bake it right before you’re ready to serve it. I made the dough and braid the night before, then baked it the next morning, so it was nice and fresh for breakfast.

This bread is really delicious – my friends gobbled it up within 30 minutes. The soft, fluffiness of the bread is complemented with the tartness of the lemon curd. Since I didn’t have pearl sugar (I really need to invest in it, so I can make Liege waffles!), I sifted powder sugar on top. However, the cream cheese is rather unnoticeable. In fact, my brother couldn’t even taste it when he ate it. So I’d either increase the cream cheese filling or leave it out completely. The latter is probably better since the flavor of the lemon curd overpowers the cream cheese anyways. You could also exchange the lemon curd with any kind of curd or jam. I think raspberry jam would be a delicious alternative.

If you’re looking for a recipe to impress friends with, this is it. This lemon braid is perfect to bring to a brunch, like Deb did, or as a dessert to a dinner party. When your friends and family see this bread, they’ll praise you for your master baking skills and you’ll smile and say thanks, knowing that it was actually incredibly easy to make.

This post has been Yeastspotted and submitted to Bake Your Own Bread.

Lazy Sunday – Brioche Crescent Rolls with Lemon Curd

A few weeks ago, I had a few lemons that I wanted to use up quickly, so I decided to make lemon curd. It’s surprisingly very easy! Just lemon juice, eggs, butter, and sugar. I couldn’t believe it. Knowing that I’d get very bored just eating lemon curd on toast, I searched for some recipes to use it up. Once I saw this one for brioche crescent rolls filled with lemon curd, I knew I had the perfect recipe.

I used homemade lemon curd, but you can always use store bought if you don’t have enough time or enough lemons. If you do have those two things, I definitely recommend making your own lemon curd. It really is very simple. The first time I made it, I noticed some of the egg whites had cooked in my curd. So I spent a good 30 minutes trying to fish out those egg white pieces.

Can you spot the egg whites?

Not wanting to go through that process again, I found this awesome tip from Fine Cooking. Cream the butter and sugar first until fluffy, then beat in the eggs, and finally add in the lemon juice. You’ll end up with a lumpy yellow mess that looks pretty disgusting. But don’t worry, once you put in on the stove, it’ll become smooth and creamy lemon curd. I tried a second time, following the tip, and got beautiful, delicious lemon curd with absolutely no cooked egg white pieces!

As I’ve said before, I’m a little hesitant when it comes to baking with lots of butter. So I cut down on the butter in this recipe and used only 1/2 cup of butter. As I was mixing in the butter, I already thought that it was too much. But despite decreasing the butter, the crescent rolls were still pretty rich.

I made half of the recipe and got about 18 crescent rolls. As you’re making them, be careful not to put in too much lemon curd on the dough. I did that several times and lemon curd was peeking out of the crescent rolls, and then spilled out as the rolls baked.

These crescent rolls puffed up and browned beautifully. The dough was so soft and fluffy while the lemon curd was tart and sweet. It’s a great combination because the tart lemon curd cuts the richness of the buttery brioche.

I baked these on a Sunday morning for my family for breakfast. They’re a nice sweet treat to enjoy with your morning cup of coffee as you read the headlines of the newspaper and bask in the sunshine on a lazy Sunday.

Brioche Crescent Rolls with Lemon Curd
Adapted from girlichef

Brioche Crescent Rolls
1/4 cup whole milk
1/4 warm water
1/8 cup + 1 teaspoon sugar
2 1/2 cups bread flour
2 large eggs, lightly beaten, at room temp.
2 1/4 teaspoon yeast
1/2 tsp. salt
1/2 cup (1 stick) unsalted butter, at room temp.
1 cup lemon curd (or any type of citrus curd)
1 large egg, beaten w/ 1 tsp. water (egg wash)
powdered sugar, for sifting

Lemon Curd
6 tablespoons unsalted butter, softened at room temperature
1 cup sugar
2 large eggs
2/3 cup fresh lemon juice
1 tsp. grated lemon zest

Brioche Crescent Rolls
1. Dissolve 1 teaspoon of sugar in warm water, then sprinkle in yeast. Let sit for 5-10 minutes.
2. In a large bowl, place the milk, sugar, and 1 cup of the flour. Add the eggs and mix until well combined. Add the yeast mixture and another cup of flour and mix until well combined. Add salt and remaining flour about a ½ cup or so at a time, until the dough comes together but is still fairly sticky.
3. Pull the dough out of the bowl and place onto a well floured surface. Knead the dough for 10-15 minutes.
4. Add a quarter of the butter at a time, waiting until well blended before adding more.
5. Clean the large bowl you used earlier, transfer the dough to the bowl, and cover with plastic wrap. Refrigerate overnight.
6. Take the dough out of the refrigerator and let sit for 30 minutes to warm up.
7. Divide the dough in half. Roll out one half of dough on a lightly floured surface into a circle that is about 10 inches wide. Cut into 12 equal wedges/triangles.
8. Add two teaspoons of lemon curd to the base of each triangle. Starting from that base, roll each triangle of dough and form into a crescent shape. Pinch ends to seal.
9. Place each crescent roll on a parchment lined sheet tray. Cover with plastic wrap and let rise for 45 minutes. Repeat with the other half of the dough.
10. Preheat oven to 350F during last 15 minutes of rise time. Brush each crescent with egg wash and bake for 15-20 minutes.

Lemon Curd
1. Cream the butter and sugar until fluffy.
2. Beat in the eggs.
3. Add in the lemon juice. (Mixture will look very lumpy and chunky).
4. Pour the mixture into a saucepan and cook over medium heat, constantly stirring with a wooden spoon. The mixture will thicken as you cook it.
5. Cook for 15 minutes until the mixture is thick enough to leave a path on the back of the spoon.
6. Remove from heat and stir in lemon zest.
7. Pour lemon curd into jar or bowl and let cool for 5-10 minutes.
8. Place plastic wrap directly on top of the surface of the curd to prevent a skin from forming.
9. Spread on bread, toast, english muffin, etc… and enjoy!
You can keep fresh lemon curd in the refrigerator for a week or two.

This post has been Yeastspotted.

Childhood Nostalgia – Red Bean Buns

Growing up, I ate a lot of red beans. No, not the savory kind used in rice and beans, but the sweet kind commonly found in Asian desserts. Sweet red bean soup served after dinner and soft buns filled with red bean paste were some of my favorite desserts. Anytime I saw red bean anything being offered, my eyes would widen and I’d choose it immediately.

So when I saw this recipe for red bean buns, I knew I had to make them. To make the dough, I used the same recipe for soft, fluffy bread using the tangzhong method. I used canned red bean paste, but you could make your own. To make the rolls, you simply enclose a small ball of paste with a circle of the dough, then roll out the dough ball into a flat oblong shape. The funnest part was cutting slits into the dough, but make sure not to cut too deep or else you’ll end up with strings of red bean buns. Simply roll the dough up (hot dog style), brush with egg wash, and sprinkle with sesame seeds.

These red bean rolls bake and brown beautifully. My mom, lover of hot out of the oven baked goods, quickly snatched up a roll once I brought the tray out of the oven.

She was so impressed by these rolls and exclaimed that they looked exactly like those sold in Chinese bakeries. My friends reinforced this when I brought them the rolls the next day. I’m pretty sure if I had packaged the rolls in one of those pink boxes the Chinese bakeries use, no one would have guessed the rolls were homemade.

Since moving away from home for college and now grad school, I rarely eat any kind of Chinese food. I suppose the overexposure to it growing up as a kid has resulted in my avoidance of Chinese restaurants as an adult. Although I do enjoy certain Chinese dishes, I usually prefer to eat other Asian cuisines, especially Korean, Japanese, and Thai. However, these red bean rolls were so delicious that I could resist eating them or deny that they were amazing. Plus, they brought me back to my childhood and let me indulge in a bit of nostalgia.

Like childhood, these buns are pretty simple, even though they may seem rather complex. They’re also super light and fluffy, just like how life felt as a kid. Not yet weighted by the burdens of adulthood, kids can fly as high and as far as they want. Hopefully, in producing bakery-worthy goods, these red bean buns will make you feel like that once again. 🙂

Red Bean Buns
Adapted from Happy Home Baking

Dough for soft, fluffy bread (follow this recipe just omit the pandan extract)
1 can of red bean paste, roll into balls of equal size
1 egg for egg wash
White sesame seeds (optional)

  1. After the dough has risen, divide the dough into equal sized portions (the number can vary depending on the size). Roll each portion into a ball and let them rest for 10-15 minutes.
  2. Flatten the dough into a round disc. Enclose each red bean paste ball with a flat disc of dough. Pinch and seal the seam tightly. Flatten the dough into a round disc and roll out into a longish oval shape. Use a knife to make a few slits, but don’t cut all the way through. Roll up into an oblong roll, then seal and pinch the edges.
  3. Place the rolls, seam side down on a greased baking tray. Leave some space in between the rolls to allow them to expand. Let the rolls proof for the second time for about 45 mins, or until they double in size.
  4. Brush the tops with egg wash and sprinkle white sesame seeds on top.
  5. Bake in pre-heated oven at 350F for 15 mins or until golden brown. Remove from oven and let cool on cooling rack.

This post has been Yeastspotted.

Apple Ginger Brioche Rolls

Apples and ginger are two of my favorite ingredients… like seriously. I eat an apple everyday for breakfast and am a HUGE ginger fan. So much of a fan that I’ll just eat pickled ginger and candied ginger alone. So ever since I saw this recipe for apple ginger brioche rolls, I’ve been dying to make them.

Being a bit afraid of butter, I’d always shy away from brioche recipes. Putting a whole stick (or even more) of butter into anything always grossed me out a bit. But I’ve since gotten over my little fear and have been wanting to make brioche for a while. I read somewhere that in earlier times, when butter was an expensive commodity and a sign of wealth, the amount of butter that was put into the dough showed how rich you were. So, a rich man’s brioche had a cup of butter while a poor man’s brioche had a mere two tablespoons. I love little food facts like that.

I decided to be more like a poor man, and keep the butter content on the low side. But if you wanted your bread to be richer, you could probably increase the butter. I also modified the filling a bit by adding a tablespoon of cinnamon. I used Saigon cinnamon, which seems to be a bit spicier, but only because that’s all we had. (Just a tip for you Costco shoppers, buy a big jar of Saigon cinnamon, it’s only $3!) If you aren’t a huge ginger fan, you might want to decrease the ginger a bit. Even I, a bonafide ginger lover, thought the heat from the ginger was a bit strong and had quite the kick.

The best part of these brioche rolls is that they will make your house smell amazing! From making the filling to baking the rolls, my mouth watered as I took in the aromas of the spices. However, be careful, these rolls are pretty messy. As I cut the rolled up dough, the filling oozed out. Not wanting to waste any of it, I coated a few pieces of the leftover dough with the delicious filling, which tasted amazing! These rolls bake up beautifully and look just like baked goods you’d find at Starbucks, especially with the parchment paper wrapping. Your friends and family won’t believe it when you say you made them yourself. 🙂

Apple Ginger Brioche Rolls
Adapted from this recipe

3 cups bread flour
2 tsp active dry yeast
1/2 cup warm milk
4 tbsp soft butter
2 eggs (lightly beaten)
3 tbsp sugar
1 apple, chopped into small cubes
2 tbsp brown sugar
1 tbsp ginger powder
1 tbsp cinnamon

2 tbsp sugar and 2 tbsp water for the sugar glaze (I forgot about this… and the rolls still tasted delicious!)

1) Preheat oven to 350F and cut 8 squares of parchment paper to fit eight muffin tins.
2) Mix the sugar and half of the warm milk in a large bowl.
3) Proof yeast by dissolving 1 teaspoon of sugar in warm milk and then sprinkling yeast on top. Let yeast dissolve and bubble for five minutes.
4) Add 1 cup of flour and lightly beaten eggs to the sugar and milk mixture. Mix until fairly smooth. Then add the proofed yeast and stir to combine.
5) Mix in the rest of the flour in batches until dough comes together. Then move dough onto countertop and knead for 5-10 min. (Note: this dough is very sticky and that’s ok! Just keep flouring your countertop as you knead. If you feel the dough is too liquid-y, add more flour.)
6) Knead in the softened butter a few tablespoons at a time until you have incorporated all of the butter. Place dough back into the bowl, cover with plastic wrap, and refrigerate overnight.
7) As dough rises in refrigerator, make the filling by mixing the chopped apple, brown sugar, ginger powder, and cinnamon together.
8) The next morning, take dough out and set aside to warm up. Then take the dough out (it will probably still be a bit sticky) and roll into a large rectangle.
9) Spread the filling onto the dough and roll the dough up into a long log.
10) Slice the log into eight pieces (or more) and place each piece in a paper lined muffin tin.
11) Let rolls rise for at least 30 minutes or doubled in size.
12) Bake at 350F for 20-25 minutes or until golden brown.
13) Enjoy the rolls straight from the oven or brush with the sugar glaze. (You can quickly make the sugar glaze by placing the sugar and water into a pot and bringing them to a boil for a minute.)

This post has been Yeastspotted.

Queen of the Quick Breads

Before I really started getting into baking, I usually baked quick breads because they were simple, easy, and always yielded good results. No need to fuss with yeast or complicated procedures or worry about the delicateness of peaks of beaten egg whites. Quick breads are so robust that you can basically throw anything in there along with the  standard flour, sugar, eggs, etc… and you’ll still have something that tastes good. Plus, you can make so many substitutions. Who cares if you only have one egg left? Just add in some applesauce.

One of my favorite quick breads is this whole wheat and millet banana bread from Joy the Baker. I love the extra crunch millet gives to the bread. I usually add in chocolate chips, which make the bread even more delicious. (You can also make chocolate chip cookies to surround your quick bread with to make it look even prettier. :P)

Another good quick bread is beer bread. You can make any kind of bread you want with just a can of any beer. It shouldn’t be good beer either. In fact, the worse the beer, the better. (So you don’t feel so guilty about using the beer in bread instead of drinking it). With several cans of leftover PBR, I made all different kinds of bread, including cinnamon raisin, green chile cheddar, and rosemary and thyme. Beer bread is so easy – it’s basically just flour, beer, and whatever else you want to put in it. Here’s a couple of good beer bread recipes, with several variations: Beer Bread 4 ways and Easy Beer Bread.

Adding a little something extra to your quick bread is always fun, and can be as simple as incorporating chocolate chips and millet or swirling in cream cheese or jam. One of my friend’s favorite quick breads that I made is a pumpkin loaf with a layer of cream cheese in the middle. I did a variation of this bread using apple sauce instead of canned pumpkin and swirling the cream cheese instead, following this recipe.

Another bonus of quick breads is that if you have leftovers, you can always make muffins! 😀

Sometimes you just want to bake something simple, easy, and foolproof. Lately, I’ve been feeling a bit off if I don’t bake something that week. And if I don’t want to deal with the added stress of yeast or some fancy French technique, I know I can always turn to the old, reliable quick bread and make something delicious. Quick breads may not be nearly as impressive or exotic as some other baked goods, but in my experience, they will always work and that reassurance is sometimes all you need.

This post has been Yeastspotted.

Bits and Bites – Homemade Pretzel Bites (and Pretzels)

One of my first endeavors at baking with yeast was homemade pretzel bites, using this recipe from Two Peas and Their Pod. The recipe had pretty simple ingredients, so I thought it wouldn’t be too bad. However, I overlooked the part where you need to boil the dough in a baking soda solution. Now, if you made regular sized pretzels with this dough, boiling wouldn’t be too bad. But if you decide to make pretzel bites, well, that’s another story. This dough makes A LOT of pretzel bites. I never counted how many, but it definitely was close to 100.

The most difficult part of the recipe, in my opinion, was boiling the dough, then transferring them to the baking sheet, sprinkling them with salt, and putting them into the oven as fast as you could. That’s a lot of steps to do in a short amount of time. After making probably 100 bites, I surrendered and made regular pretzels so I’d use up the dough faster. Shaping the dough into pretzel shapes was actually a lot of fun. If you want to bake with your kids, I definitely recommend making pretzels. They’ll really enjoy it. 🙂

These pretzel bites were such a hit! My friends were amazed that I made them myself and several of them asked me for the recipe. If you’re in the mood for baking something a bit more savory, I definitely recommend making pretzels. They’re pretty simple and delicious!

Just a few notes: 1) I noticed though was that if you boil the dough in the baking soda solution too long, the pretzels taste a bit like baking soda. 2) When sprinkling the bites/pretzels with salt, add a lot more than you think you should. The salt falls off easily, so the pretzels aren’t that salty. 3) If you decide to sprinkle them with cinnamon and sugar (like I tried), do this after they’re baked. If you sprinkle them before, the sugar might burn!

Soft Pretzels
Adapted from Two Peas and Their Pod

1 1/2 cups warm water
2 tablespoons light brown sugar
1 package active dry yeast (2 1/4 teaspoons)
3 ounces unsalted butter, melted
2 1/2 teaspoons kosher salt
4 1/2 to 5 cups all-purpose flour
Vegetable oil
3 quarts water
3/4 cup baking soda
1 whole egg, beaten with 1 tablespoon cold water
Coarse sea salt

1. Combine the water, sugar, yeast, and butter in the bowl of a stand mixer and mix with the dough hook until combined (or if you don’t have a dough hook like me, do it the old-fashioned way – by hand!) Let sit for 5 minutes. (I proofed the yeast separately, just with warm water and sugar.) 

2. Add the salt and flour and mix on low speed until combined. Increase the speed to medium and continue kneading until the dough is smooth and begins to pull away from the side of the bowl, about 3 to 4 minutes. If the dough appears too wet, add additional flour, 1 tablespoon at a time. Remove the dough from the bowl, place on a flat surface and knead into a ball with your hands.

3. Oil a bowl with vegetable oil, add the dough and turn to coat with the oil. Cover with a clean towel or plastic wrap and place in a warm spot until the dough doubles in size, about 1 hour.

4. Preheat the oven to 425 degrees F.

5. Bring the water to a boil in a small roasting pan (I used a pot) over high heat and add the baking soda.

6. Remove the dough from the bowl and place on a flat surface. Divide the dough into 8 equal pieces, about 4 1/4 to 4 1/2 ounces each. Roll each piece into a long rope measuring 22 inches and shape. Cut the dough into one inch pieces to make the pretzel bites. (Or shape the dough into pretzels!)

7. Boil the pretzel bites in the water solution in batches. Boil for about 30 seconds. (Make sure you don’t leave them in for too long!) Remove with a large slotted spoon.

8. Place pretzel bites on a baking sheet that has been sprayed with cooking spray. Brush the tops with the egg wash and season liberally with the salt. Place into the oven and bake for 15 to 18 minutes until golden brown.

9. Remove to a baking rack and let rest 5 minutes before eating.

This post has been Yeastpotted.

Soft and Fluffy – Pandan Bread and Pineapple Buns

Being Chinese-American, I’ve been to a lot of Chinatowns, dim sum restaurants, and of course, Chinese bakeries. Whenever we visited my relatives in Oakland, we’d always go to Chinatown. And if we didn’t happen to eat dim sum that morning, we’d always go to my mom’s favorite bakery to buy a big pink box filled with everyone’s favorite Chinese buns and pastries. Most people love the pineapple buns (bo luo bao) and praise the crunchy sweet topping. However, I was an exception and preferred the light, fluffiness of the bread over the topping. Luckily, my brother was like most people, so I’d trade him the topping of the bun for the fluffy bread. 🙂

For years, I’ve been mystified by how those buns were always so fluffy, thinking those Chinese ladies in those bakeries had some magical powers. Recently, through thorough searching on the internet, I’ve discovered their secret to achieving such soft, fluffy bread. Apparently, it’s tangzhong, a scalded dough that helps keep the bread soft.

I thought I’d jazz the bread up a bit by adding a few drops of Pandan extract that I had bought from the local asian grocery store. Be careful to only add a couple of teaspoons since the extract is very intense. As you can see from above, it turned the white dough into a dark, green color. Alien dough anyone?
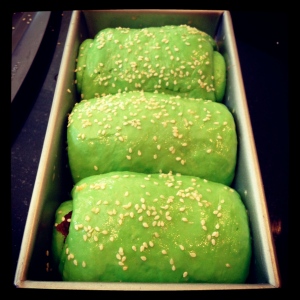
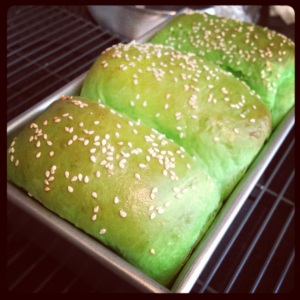
First, I decided to make loaves of Pandan bread. I think I let the dough rise too long, so the rolls were pretty huge and I could only fit in three rolls of bread into my loaf pan. Since I was going all out, I decided to add a layer of red bean paste inside the bread and a heavy sprinkling of sesame seeds on top. The bread baked beautifully, rising out of the pan and browning on top. However, make sure to bake it long enough. Deceived by the browned top, I took the loaf out too early and certain parts of the inside, specifically the parts of the rolls that joined together, were not cooked enough. But most of the bread was perfect, so soft and fluffy!
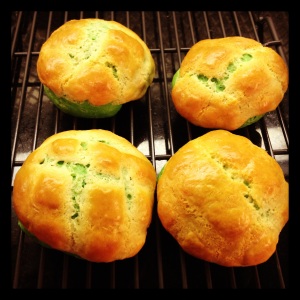
With the leftover dough, I made pineapple buns. My brother found this recipe for the infamous pineapple topping (in US units! yay!), which actually has no pineapples in it. 😛 Instead, it’s a mixture of eggs, sugar, butter, and flour. After I had placed the flat, round disks of topping (rolled out by my wonderful brother) onto the buns and scored the tops, I realized that the buns looked exactly like little turtles! So cute!

Once I took the buns out of the oven, my mom quickly grabbed one and took a bite. Ignoring my protests that they needed to cool, she countered that buns always taste best fresh out of the oven. I definitely cannot argue with that. So listen to my mother and eat these right after you take them out of the oven!
Although this bread and these buns are a lot of work (and waiting), they are definitely worth it. Your friends and family will not believe you when you say you made them yourself because they look exactly like store-bought Chinese bakery buns. My mom was so amazed that she wanted me to make them whenever we have guests over. Your mom wanting to show off your buns is definitely the best form of flattery. (If you got that pun, get your mind out of the gutter! haha)

But the most satisfying part of making the bread and pineapple buns was making them with my younger brother. It may be a bit surprising, but he’s actually the baker of our family. All throughout middle school he’d bake cookies, cakes, and cupcakes for his classmates and teachers. His friends even got him a standing mixer for his birthday! Along with our mutual love for Snow Patrol, our love for baking has helped us bond and become closer siblings. Baking with my brother was so much fun that the idea of opening a family bakery crossed my mind. Maybe that’ll be my back up plan if I ever decide that grad school isn’t for me…

Soft, Fluffy Pandan Bread (Tangzhong method)
Adapted from Kirbie’s Cravings and Christine’s Recipes

2½ cups bread flour
3tbsp + 2 tsp sugar
1/2 tsp salt
1 large egg
½ cup milk
120g tangzhong (1/2 of the batch made from this recipe)
2 tsp instant yeast (I used dry active yeast and it worked fine. I made sure to proof the yeast first with 1/4 cup warm water and 1 tbsp of sugar.)
3 tbsp butter (cut into small pieces, softened at room temperature)
2 tsp pandan paste

1. Combine the flour, salt, sugar and instant yeast in a bowl of a stand mixer. Make a well in the center. Add in all wet ingredients: milk, egg and tangzhong and pandan paste. Knead until your dough comes together and then add in the butter and continue kneading.  Keep kneading until the dough is smooth, not too sticky on the surface and elastic. (Kirbie’s recipe says she kneaded the dough for about 18-20 minutes. I didn’t knead it quite that long, probably only 10-15 min. But I forgot to do the window pane check, so not sure if my dough was actually kneaded long enough. Whoops!)
2. Knead the dough into a ball shape. Take a large bowl and grease with oil.  Place dough into  greased bowl and cover with a wet towel. Let it proof until it’s doubled in size, about 40 minutes.
3. Transfer to a clean surface. Divide the dough into four equal portions. Knead into balls.  Cover with cling wrap, let rest for 15 minutes.
4. Roll out each portion of the dough with a rolling pin into an oval shape.  Take one end of the dough and fold to meet the middle of the oval. Take the other end and fold to meet on top. (Check out Kirbie’s website for step-by-step pictures. These really helped me a lot when I was rolling the dough).
5. Flip dough over with the folds facing down,and flatten dough with rolling pin. Flip dough over so the folds face up. (If you want, slather on a layer of red bean paste like I did here). Now roll the dough up. Place each of the rolls into the bread pan and put a piece of plastic wrap over the rolls. Let them rise until double the size, approximately another 40 minutes. (Since I was busy making the pineapple buns, I probably let the dough rise a lot longer… oops).
6. Beat an egg and brush egg mixture on top to create shiny egg wash finish. Sprinkle sesame seeds on top!
7. Bake at 330 degrees F for approximately 30 minutes.

Pineapple Buns and Topping
Adapted from Homemade Chinese (I only used half of the topping)

Pandan dough (from above)
2.5-3 tbsp sugar
1/8 cup butter
1 egg yolks
1/4 tsp baking soda
1 tbsp milk
1/2 cup flour
1 tsp baking powder

How to Prepare Topping:
1. Beat the butter and sugar until creamy and fluffy.
2. Add egg yolk, baking soda, and milk together, and mix well.
3. Sift the flour and baking powder into the butter mixture, and mix by hand until it’s smooth and not sticky. Be careful not to manipulate it too much as it will form gluten (we didn’t really see this step and didn’t notice any gluten forming)
4. Wrap the topping in plastic and refrigerate it for an hour and a half minimum.

How to Make Pineapple Buns:
1. Shape dough into equal sized balls, cover with plastic wrap, and let rise for at least 15 min.
2. Take the prepared pineapple topping and roll it to a thickness of about 1-1.5 in.
3. Brush the buns with a small amount of water, and place the pineapple topping ontop of the buns. The water will help the topping stick to the buns.
4. Take a knife and lightly score the toppings with a criss-cross pattern.
5. Lightly beat 1 egg yolk and brush the buns and toppings with it. The egg yolk will provide the buns with a nice rich yellow color.
6. Bake the buns at 375 degrees Fahrenheit for 10 min.
7. Let cool slightly, then devour!

This post has been Yeastspotted.

Love it or Hate it – Cilantro Rolls

People either love cilantro or hate it. I fall in the category of people who absolutely love cilantro. It has such a crisp and refreshing taste! I love buying a bunch of cilantro at the grocery store, but I can never use it all up before the leaves turn brown and soggy. Even though the gigantic bunch usually only costs about $0.40, it always saddens me when I have to throw out cilantro gone bad.

 So when I spotted this recipe from First Look, then Cook, I knew I had to try it out immediately to use up the cilantro sitting in my refrigerator. The dough is like most breads I’ve made before, except that butter is cut into the flour, just like pie crust dough. I’d suggest using bread flour if you have it. I accidentally used whole wheat pastry flour, thinking it’d be fine. But since pastry flour doesn’t have as much gluten as all-purpose or bread flour, it took forever for the bread to toughen up. Luckily, I remembered I had some bread flour. Once I added that, the dough toughened up quickly and was much easier to knead. Also, this dough refrigerates pretty well. Just make sure you let it warm back up to room temperature before using it again. I let it warm up and rise a bit again since I was worried I might get hard rolls.


One of my favorite things about making yeasted breads is the kneading and rolling step. The feel of the dough, the motion of pushing and folding the dough, and the smell of fresh dough… they all mesmerize me. In fact, they mesmerize me so much that I often forget everything else going on and focus only on the dough in front of me. It’s a great way to clear your mind. Not to mention, the physical effort of kneading and rolling allows you to release any pent-up anger.

I brought these rolls to a barbecue (they’re just as popular here as in Texas!) and they were a hit! People were intrigued once I set them down on the table, guessing they were pesto rolls. I omitted the sesame seeds, since I didn’t have any on hand. These cilantro rolls are so easy to make and can be a great dish to bring to a party or a nice addition to a weeknight dinner.

This post has been Yeastspotted.

Only the Best for Mom – Brioche French Toast

For Mother’s Day, my brother decided to make my mom french toast. Wait before you dismiss this as just a regular old french toast recipe (like I did). The little details of this recipe really make this french toast better than any you’ve ever had.

My friend Rachel, who spent a year studying in France, once told me that french toast is actually the French dish, pain perdu or “lost bread.” People would soak their undesirable, old, hard bread in the egg/milk mixture to recover the moistness that it had already lost. However, American culture has transformed pain perdu into one of the most desirable breakfast dishes. So attractive that we no longer use old bread, but instead fresh bread, defeating the original purpose of the dish and often times making a soggy french toast. But this recipe helps to remedy that by toasting the bread before soaking it. This made a big difference as did the type of bread used. Challah is suggested, but we used brioche, which resulted in a rich, buttery french toast that was absolutely delicious. However, I had to stop eating after one piece of toast due to its richness.

My brother had the brillant idea of adding macerated mixed berries to the dish, which helped cut some of the rich flavor of the toast. By adding sugar to the fruit, you create a concentration gradient, with a higher concentration of sugar outside of the fruit than inside the fruit. As a result, the fruit release its juices to achieve chemical equilibrium. Being a chemical engineering student, I love it when I can explain real-life phenomena using concepts I’ve learned in school. 😀 Anyways, getting back to the food, the macerated berries were delicious and add a nice touch to the already amazing french toast.

This french toast was a great dish to make for our mom for Mother’s Day. But don’t wait for a special day like that to try it out. It’s a great and easy recipe that will make you feel like you’re eating brunch at a fancy bistro instead of at home.

Note: This recipe comes from America’s Test Kitchen. Unfortunately, they don’t post the recipe online unless you have a subscription, but you can watch how to make it here.

This post has been Yeastspotted.